vim有不少的plugin,記錄一下vim套件管理vundle以及兩個好用的plugin-sanipmate+autocomplpop
1. vundle:
vundle是一個非常好用的vim套件管理器,用法就像debian的apt-get,之前用過其他的管理器例如pathogen,可是這些套件管理器並不像vundle好用,還要開瀏覽器或是用git clone下來,增加了不少步驟,vundle只要簡單地把想要的套件寫在~/.vimrc內,然後進入vim指令模式輸入:BundleInstall就完成套件的安裝,非常方便,以下記錄vundle的用法:
a. 安裝方式: 只需要在終端機輸入:
git clone https://github.com/gmarik/vundle.git ~/.vim/bundle/vundle
b. 修改~/.vimrc:(下面是官方的設定範例)
set nocompatible              " be iMproved
filetype off                  " required!

set rtp+=~/.vim/bundle/vundle/
call vundle#rc()

" let Vundle manage Vundle
" required!
Bundle 'gmarik/vundle'

" My bundles here:
"
" original repos on GitHub
Bundle 'tpope/vim-fugitive'
Bundle 'Lokaltog/vim-easymotion'
Bundle 'rstacruz/sparkup', {'rtp': 'vim/'}
Bundle 'tpope/vim-rails.git'
" vim-scripts repos
Bundle 'L9'
Bundle 'FuzzyFinder'
" non-GitHub repos
Bundle 'git://git.wincent.com/command-t.git'
" Git repos on your local machine (i.e. when working on your own plugin)
Bundle 'file:///Users/gmarik/path/to/plugin'
" ...

filetype plugin indent on     " required!
"
" Brief help
" :BundleList          - list configured bundles
" :BundleInstall(!)    - install (update) bundles
" :BundleSearch(!) foo - search (or refresh cache first) for foo
" :BundleClean(!)      - confirm (or auto-approve) removal of unused bundles
"
" see :h vundle for more details or wiki for FAQ
" NOTE: comments after Bundle commands are not allowed.
按照官網的設定檔設定完之後,到底要怎麼把想加入的套件寫在~/.vimrc中告訴vundle呢?注意上面設定檔中的關鍵字Bundle就是把想要加入的套件加入~/.vimrc中,在vundle有三種加入套件寫法,如果套件是在GitHub的vim-script的套件庫中,只需要輸入:
Bundle 套件名稱如果是在GitHub的其他套件庫中的話,輸入:
Bundle 帳號/套件名稱
其他的git server輸入:
Bundle gitURL
此外還可以把套件放在本機的某個位置,然後輸入該套件的url
Bundle file://URL
完成上面的設定檔之後,只剩下將套件庫加入,此時只要進入vim的命令模式然後輸入
:BundleInstall
就可以惹,超級簡單,如果有套件不要用的話,只要將~/.vimrc中想要刪除套件的Bundle給移除掉,然後執行:
:BundleClean
就可以把不需要用到的套件給刪除掉!!
2. snipmate+autocomplpop
snipmate這個套件是code template,這是啥?寫c code的時候常常會先把
#include <stdio.h>
int main(int argc, char** argv){

    return 0;
}
給先打好,寫多了覺得超煩,如果有像IDE一樣先把一些基本的code先"生"好該有多好,snipmate就是這種東西。autocomplpop是自動跳出相關字,例如常常用的printf總是希望打個兩個字"pr"然後編輯器就會自動跳出來printf給你選,超級方便的,也不用擔心自己拼錯,非常好用。
a. 安裝方式 在~/vimrc中輸入
Bundle 'L9'
Bundle 'othree/vim-autocomplpop'
Bundle "MarcWeber/vim-addon-mw-utils"
Bundle "tomtom/tlib_vim"
Bundle 'honza/vim-snippets'
Bundle "garbas/vim-snipmate"
然後進入vim的指令模式輸入:
:BundleInstall
上面的步驟就完成snipmate+autocomplpop的安裝,當然還需要在~/.vimrc設定
let g:acp_behaviorSnipmateLength = 1
接著就可以看到snipmate+autocomplpop完美配合,只要在編輯器中輸入關鍵字的大寫就可以看到如下圖的樣子

然後選擇要的"code",超級騷包XD
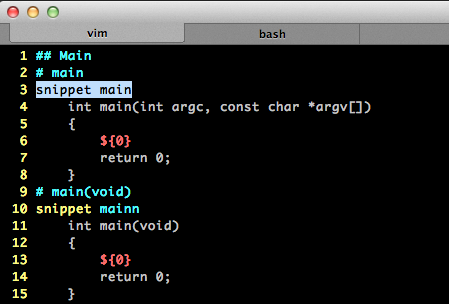
b. 增加template 要增加template要去修改~/.vim/bundle/vim-snippets/snippets資料夾下的*.snippets檔案,例如要修改c的template就修改c.snippets,修改方式如下
snippet 關鍵字
    code
下圖是修改的檔案內容:

上面兩個搭配非常好用,缺點是如果想要自動pop出相關的code需要輸入關鍵字的"大寫",不過這樣已經算超好用的惹!注意的是如果不用大寫,在關鍵字輸入完之後是不會自動pop出對應的code,需要另外按tab才會跳出對應的code,所以可能會需要記住一些常用的關鍵字,這點可能沒有IDE好用,但是IDE都超胖,snippet做到這樣已經超級屌惹!
Reference:
沒有留言:
張貼留言